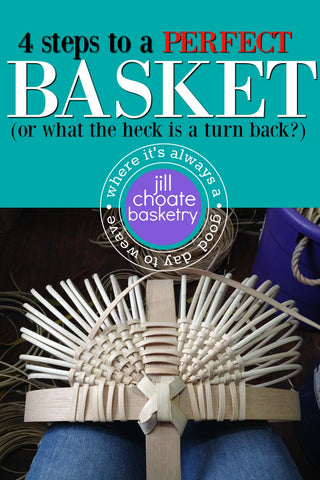

Turn backs, packing, filling, three different terms for the same technique. A way to even out the corners in a rib constructed basket so a straight line of weave is achieved. In the next three photos we're going to dissect the OVAL MELON BASKET into four easy steps.
What you've got:
In the above photo all three sets of ribs are woven in and the basket is ready for the corners in the basket to begin to be "turn backed" on (for a lack of a better term). At least two rows of weaving is now required so that all ribs have been singled out with the weave. Then it's time to start turning back on the corners of your basket.

Where we're heading:
Photo above shows a corner that has been turned back (or filled). Notice on rib #4 from the hoop on the bottom of the basket (remember rib constructed baskets are woven upside down) the first turn back occurs. The turn happens ON TOP of the rib and is turned back UNDERNEATH the weave. The reason for this is the next row of weaving will enable this turn back row to be pushed down on the previous row of weaving thereby eliminating any holes.
The next turn back row happens on rib #6 (every other rib) with the same procedure as above. You may elect to return to the rim with every row or your basket may require turn backs toward the rim hoop, (see rib #15).

Think like a skunk, (put a stripe of weave down the back):
Once you've got the four corners of your basket evened up it helps to weave a stripe down the center of your basket. This is a wonderful technique for several reasons:

Inside the basket is where the truth lies:
If your wondering where the directions lie in the progress of your basket look inside of it. This is where the road map of what is required (weaving wise) shows up plainly on your basket. Remember that in every rib constructed basket what your trying to accomplish is a straight line of weave from the rim to the bottom of the basket and up the other side to the other rim (hence the skunk stripe). After that you keep that thought (and weave) with turn backs until everything straightens up and flies right (and until both sides meet the stripe).
What baskets use these techniques?
Twill Oval Melon Basket, Blue Streak Melon Basket, Black Tie Affair Melon Basket.
See the turn back technique in action:
Thanks so much.. Your instructions are clear and concise just what I need. Excited to see more. Julie Morrow
Thank you for explaining! The technique has always confused me a bit:)
Thanks, Judy. Wonderful information and demonstration! I’ve subscribed and am looking forward to more good stuff.
I’ve been making ribs for over 20 years and you still taught me something. Love the fact that you use oval/oval reed and really like your turn back technique
Jill Choate
Author